Gluten-Free Kitchen Set-Up: How to Safely Reset Your Pantry
When someone in your family needs to eat gluten-free, one of the first jobs is going through the kitchen properly. And very quickly, you realise that it’s more than just removing bread and pasta.
There are sauces to check, baking ingredients to look through, jars that may already have crumbs in them, and plenty of foods that suddenly need a closer inspection.
The easiest way to tackle it isn’t randomly reading labels while standing in the pantry wondering where to begin.
A much easier approach is to the work through your kitchen in a clear order so you can quickly see what needs removing, what needs checking, what needs replacing and how your kitchen will work safely from now on.
Let’s get started:
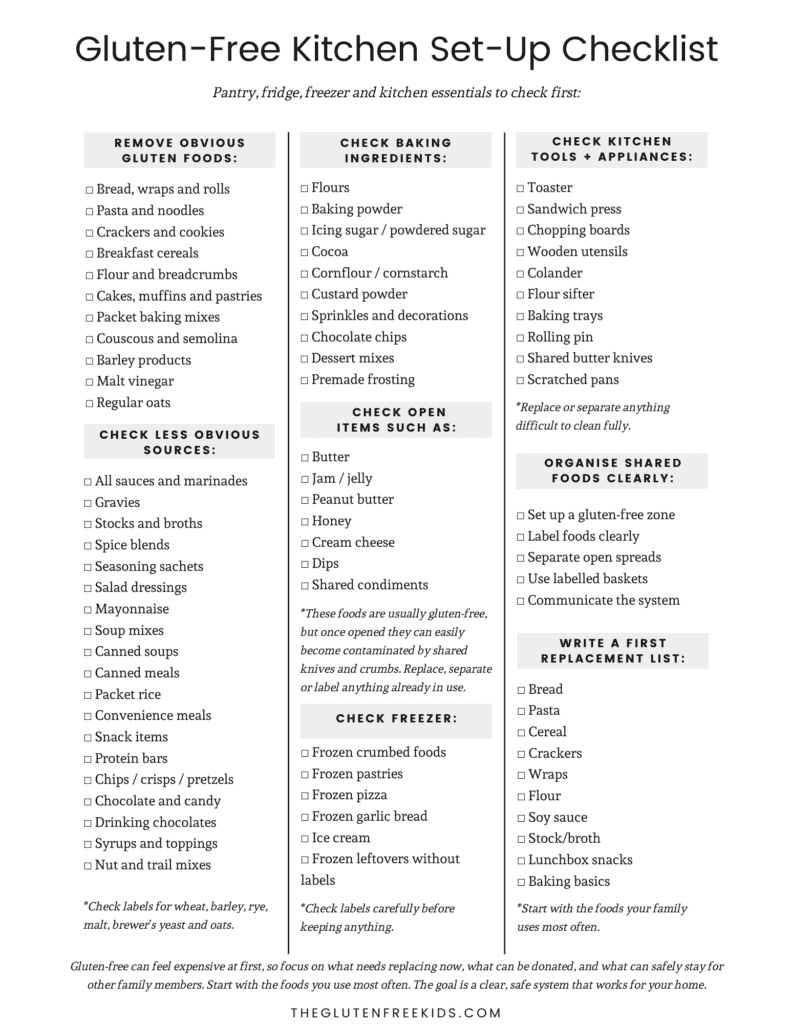
Step 1: Remove the Obvious Gluten Foods First
Start by pulling out all foods that clearly contain gluten.
This includes:
- regular bread,
- wraps,
- muffins,
- cakes,
- pastries,
- cookies,
- pasta,
- noodles,
- crackers,
- pizza bases,
- breakfast cereals,
- flour,
- breadcrumbs,
- packet cakes and baking mixes,
- regular oats,
- couscous,
- semolina,
- barley products,
- malt vinegar
Create one clear pile or section.
At this stage, you don’t need to decide yet if you’re discarding, donating, relocating, or keeping these for other family members. First, just get them out where you can clearly see them.
Step 2: Check the Foods That Often Catch People Out
Now move to the products that often contain gluten unexpectedly.
These are the food where gluten may appear through thickeners, flavourings, additives or ingredients that are easy to overlook – so we need to check them all!
Check:
- all sauces
- gravies
- flours
- marinades
- stir-fry sauces
- salad dressings
- mayonnaise
- stock powders and cubes
- seasoning sachets
- spice blends
- soup mixes
- canned soups
- canned meals
- packet rice mixes
- packet noodles
- snack bars
- muesli bars
- chips/crisps
- flavoured nuts
- lollies/candy
- chocolate products
- frozen convenience foods
Anything uncertain goes into a must-check pile until you confirm it (search online the brand name and item if unsure of the labelling).
Check the labels on each item and if it contains gluten, then add it to the previous pile.
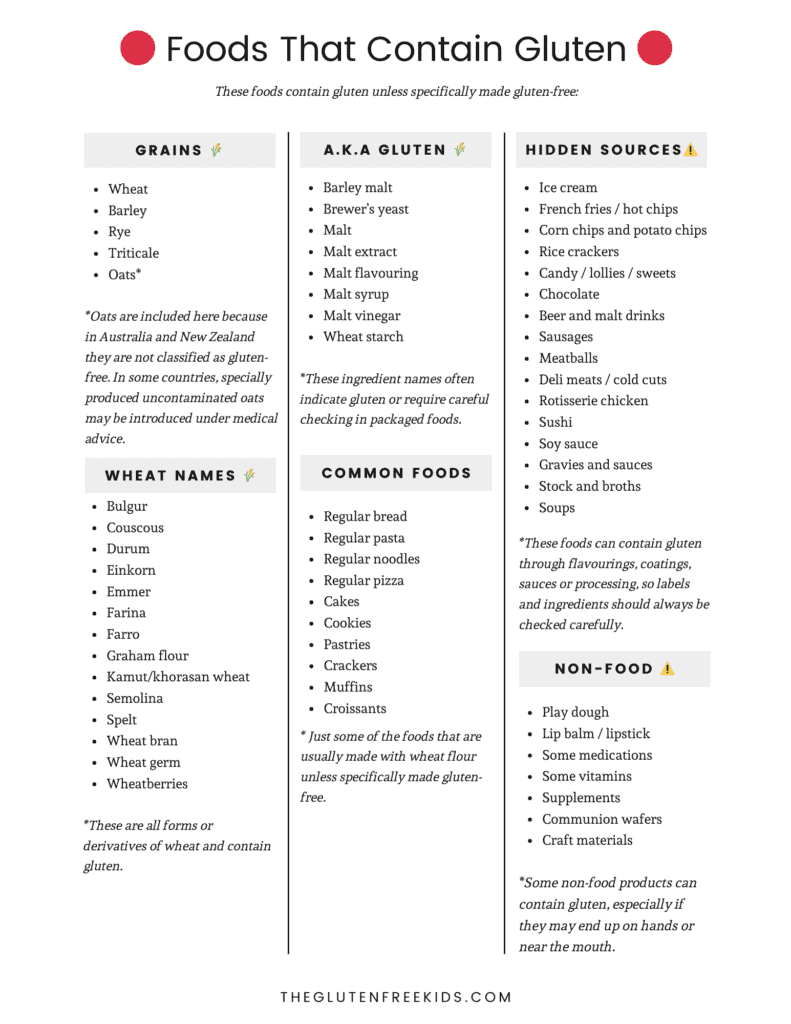
🔎 Look for ingredients such as:
- wheat
- barley
- rye
- malt
- brewer’s yeast
- oats
If it contains gluten, move it to your gluten pile.
Step 3: Check Baking Ingredients
Baking ingredients deserve their own check because it’s easy to assume these are automatically safe when they often aren’t. So pull out and check:
- baking powder
- icing sugar/powdered sugar
- cocoa
- cornflour/cornstarch
- custard powder
- decorating and cupcake sprinkles
- chocolate chips
- cake decorations
- packet cake mixes
- dessert mixes
- custard powder
- premade frostings
Then check all flours carefully and remove any gluten-containing flours such as:
- regular/all-purpose flour
- self-raising/self-rising flour
- bread flour
- pastry flour
- semolina
Check the labels on each item and if it contains gluten, then add it to the gluten pile.
Step 4: Check Open Spreads and Shared Containers
This is one of the most important cross-contamination checks.
Anything that has had a knife dipped in after touching regular bread may already be contaminated. So you will also need to pull out any opened containers and jars of:
- butter
- jam/jelly
- peanut butter
- spreads
- honey
- cream cheese
- dips
If crumbs may have entered, it needs replacing or separating.
A very practical solution going ahead is:
- squeeze bottles
- separate labelled jars
- dedicated gluten-free shelf space
- one gluten-free version only
Step 5: Decide What Needs Replacing First
Before buying gluten-free replacements for everything in the ‘gluten’ pile, stop and ask ‘what do we actually use often?’
Because not every gluten product needs replacing immediately. Usually, you can start with replacing these items at first:
- bread
- pasta and noodles
- cereal
- crackers
- wraps
- flour
- soy sauce
- stock/broth
- shelf-stable snacks
- gluten-free baking basics
This will keep costs under control and avoids buying products that might sit unused.
Step 6: Decide How Shared Foods Will Work
If you’re home is going 100% gluten-free, you can skip this step. But, if gluten will remain in the home, this part matters just as much as checking labels.
The goal is to remove guesswork, and it’s especially useful for children, visitors, grandparents, babysitters and those busy mornings!
Helpful systems include:
- one shelf for gluten-free
- one shelf for gluten foods
- labelled baskets
- labelled spreads
- separate lunchbox storage
- clear family rules about crumbs and preparation areas
Simple labels help:
- Gluten-Free
- Contains Gluten
- Check Before Using
The more clearer the system, the fewer mistakes happen.
Step 7: Check Kitchen Tools and Appliances
The pantry is only one part of the reset. Some kitchen items can hold crumbs or gluten residue.
You will need to check your:
- toaster
- sandwich press
- chopping boards
- wooden utensils
- scratched non-stick pans
- flour sifters
- colanders
- baking trays
- rolling pins
A separate toaster is usually essential. Porous or scratched surfaces require checking too, as crumbs can remain trapped.
Once someone in the house has coeliac disease, this kitchen reset is worth doing properly from the start.
You don’t need to replace every product immediately, but you do need to clearly identify what contains gluten, what is safe, what may already be contaminated, and how your kitchen will work from now on.
A proper pantry overhaul removes a huge amount of daily uncertainty.
And once the shelves are organised, labels are checked, and the main substitutes are in place, everyday gluten-free cooking becomes much simpler than it first feels 💛